$select_table_query = "show tables like 'note'";
$query_go = mysql_query($select_table_query, $db_connect_id);
$query_result = mysql_fetch_row($query_go);

if($query_result[0] == $table_name) echo 'note라는 테이블이 있습니다.';

else echo 'note라는 테이블이 없습니다.';

exit;

'MYSQL' 카테고리의 다른 글

MySQL 문자열 길이 구하는 함수  (0) 2014.03.13
Posted by 초보용
,

먹고 산다는것은...

2013. 10. 30. 15:40

보호되어 있는 글입니다.
내용을 보시려면 비밀번호를 입력하세요.

asp 노캐쉬

ASP 2013. 10. 29. 09:49

Response.Expires = -1
Response.Expiresabsolute = Now() - 1
Response.AddHeader "pragma","no-cache"
Response.AddHeader "chche-control", "private"
Response.CacheControl = "no-cache"


Response.Expires = [(날짜) 혹은 (기간)]

브라우저에서 캐쉬된 페이지의 만료를 지정합니다.

페이지가 만료되기 전에 동일 페이지가 호출 될 경우 캐쉬된 페이지가 호출 됩니다.

기간 단위는 분 입니다. (-1)은 즉시 만료


Response.ExpiresAbsolute = [(날짜)(시간)]

Expires와 동일한 역할을 수행 하나 날짜와 시간까지 지정이 가능합니다.


Response.CacheControl = [(TRUE) 혹은 (FALSE)]

서버와 클라이언트 사이에는 응답시간 단축을 위하여 Proxy Server 가 존재할 수 있습니다.

CacheControl 을 사용하여 이러한 캐시의 사용 여부를 지정 합니다.


Response.AddHeader "pragma","no-cache"
Response.Expires/ExpiresAbsolute 와 동일한 기능을 수행합니다.

페이지의 만료시간을 헤더를 지정하여 클라이언트로 전송합니다.


Response.AddHeader "chche-control", "private"
Response.Expires/ExpiresAbsolute 와 동일한 기능을 수행합니다.

Proxy Server 를 이용한 캐시 사용 여부를 헤더를 지정하여 클라이언트로 전송합니다.


'ASP' 카테고리의 다른 글

파일명 불러오기  (0) 2014.03.17
asp fso  (0) 2014.02.25
엑셀전환시 <br>태그  (0) 2013.10.28
ABCUpload 이용해서 파일 업로드 및 다운로드  (0) 2013.10.26
폴더검색 fso  (0) 2013.10.24
Posted by 초보용
,

엑셀전환시 <br>태그

ASP 2013. 10. 28. 12:53
엑셀전환시 <br>태그를 alt + enter 값으로 변경해주는 css다.
<style>
br
 {mso-data-placement:same-cell;}
</style>


'ASP' 카테고리의 다른 글

asp fso  (0) 2014.02.25
asp 노캐쉬  (0) 2013.10.29
ABCUpload 이용해서 파일 업로드 및 다운로드  (0) 2013.10.26
폴더검색 fso  (0) 2013.10.24
asp 모든폼 갖고오기  (0) 2013.10.24
Posted by 초보용
,

class연습

PHP 2013. 10. 27. 13:24

----------------------

1. 부모클래스 a정의를 하고, a클래스 내의 함수 a1을 정의하고, a1함수내에서 여러분의 이름을 출력할 수 있게 정의하시오

2. 첫번째 자식클래스를 b를 정의하고 b1함수 정의하고,  b1함수내에 여러분의 주소를 폰번호를 출력할 수 있게 정하시오.

3. 두번째 자식클래스 c를 정의하고 c1함수정의하고 c1함수내에 여러분의 주소를 출력할 수 있게 정의하고, 각각의 상속으로 이름, 폰 번호, 주소를 출력하시오. 단, 함수 이름과 클래스 이름을 같게 사용하지 마세요


-----------------------

class연습.php

-----------------------

<?

class a {
 //최상위 부모 클래스 - 할아버지로 생각해보자
 function a1(){
  //함수  a1정의
  echo("송주영". "<p>");
  }
}

class b extends a {
 //할아버지 클래스 a로 부터 아버지클래스 b로 상속
 function b1() {
  echo("017-777-7777 <p>");
   }
}

class c extends b {
 //아버지 클래스 b로부터 손자클래스 c로 상속
 function c1(){
  echo("서울 강동구 성내동 <p>");
 }
}

//클래스 내의 함수를 호출하려면 지시연산자 ->를 사용해야 한다.

$a = new a;
$a -> a1(); //할배클래스 내의 a1함수호출하면서 이름을 출력한다.

$b = new b;
$b -> b1(); //어버지클래스 내의 b1함수 호출하면서 폰번호를 출력

$c = new c;
$c -> c1();//손자클래스 내의 c1함수 호출하면서 주소를 출력한다.


/*
class함수 사용법

class 클래스명 {
 함수;
 }

자식클래스를 사용할 경우
class 자식클래스 extends 부모클래스명 {
  함수;
}


*/
?>


-----------------------------

결과값

------------------------------


[출처] [php] class연습|작성자 gloria

'PHP' 카테고리의 다른 글

문자열 컨트롤  (0) 2014.03.25
클래스 & 객체  (0) 2013.10.27
Class 예문  (0) 2013.10.27
Class 사용법  (0) 2013.10.27
파일업로드 시 파일명 관리  (0) 2013.10.24
Posted by 초보용
,

클래스 & 객체

PHP 2013. 10. 27. 13:23

 -------------------

클래스 & 객체

 -------------------

1. 클래스(class)란? 일련의 변수와 이변수들을 사용하는 함수들의 모음으로 하나의 형태가 되어 변수를 선언하는 데 사용한다. 여기서 생성되는 변수가 바로 ‘객채’가 되는 것이다.


2. 객체들 생성하기 위해서는 new연산자를 사용한다. 그리고 클래식내의 함수에 접근하기 위해서는 ‘->’지시 연산자를 사용한다.


3. 클래스는 확장이 가능하다. 즉, 부모 클래스로부터 자식 클래스를 만들고 상속하기 위해서는 ‘extends'라는 키워드를 사용한다.


4. 클래스의 함수 중에 ‘생성자’라는 함수가 존재하는 데, 이것은 클래스 이름과 함수 이름을 같게 사용하여 새로운 객체가 생성될 때 마다 자동으로 함수를 호출하게 된다.


-------------------

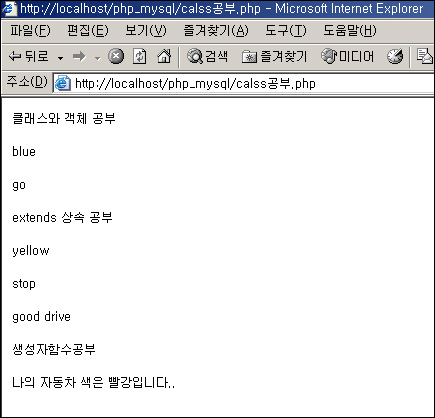
calss공부.php

-------------------

<?
echo("<p>클래스와 객체 공부 </p>");

class car {
 //car()라는 부모 클래스 정의한다.
 function view_car($part) {
  //view_car라는 함수 정의, $part매개변수도 선언한다.
 $carPart =array("top"=>"blue","window"=>"yellow","wheel"=>"red");
 
 echo($carPart[$part] . "<p>");
 }

 function drive_car($light) {
  //drive_car함수정의하고, $light매게변수 선언
  $drive = array("red"=>"stop","green"=>"go");
  echo($drive[$light] . "<p>");
 }
}

$a = new car;
//새로운 변수명 객체 a 선언
$a-> view_car("top");
// ->지시연산자에 의해서 car클래스 안의 view_car함수에 접근한다.
$a -> drive_car("green");
// ->지시 연산자에 의해서 car클래스 안의 drive_car함수에 접근

echo("<p> extends 상속 공부 <p>");

class my_car extends  car {
 //중요한 상속이다. 즉 부모 클래스인 car로부터 자식클래스인 my_car클래스로 상속되며  만들어진다.
 //my_car클래스로 정의된 객체는 기존의 car클래스 내의 모든 함수는 물론이고 새로 정의된 함수에도 접근가능하다.이유는 모든 것이 상속되기 때문이다.

 function ride($man) {
  //ride 함수정의
  $rideCar = array("me"=>"good drive","you"=>"bad drive");
  echo($rideCar[$man] . "<p>");
  // .은 문자열 연결 연산자이다.
 }

}


$b = new my_car; //새로운 객체 b 선언, 자식 클래스로부터도 만들 수 있다.
$b -> view_car("window");
//view_car함수는 부모 클래스인 car에서 정의한 함수이지만, 상속이 되었기 때문에 view_car함수를 호출해서 사용할 수 있다.


$b -> drive_car("red");
//drive_car함수도 부모 car클래스내의 함수이다.
$b -> ride("me");
//ride함수는 자식클래스인 my_car클래스내의 함수이다.

echo("<p>생성자함수공부 <p>");

class echo_car extends car {
 //echo_car 자식 클래스 생성

 function echo_car() {
  //함수 이름과 클래스명이 같다. 이럴경우 지시연산자를 사용할 필요가 없다.
  echo("나의 자동차 색은 빨강입니다..");
 }
}

$c = new echo_car;
//$c -> echo_car();  -> 지시연산자를 사용하여 클래스내의 함수를 호출해야 하지만 클래스 이름과 함수 이름이 같아서 지시연산자를 생략해도 함수를 자동으로 호출한다.

?>
  
------------------------------

결과값

---------------------------------


[출처] [php] 클래스 & 객체|작성자 gloria

'PHP' 카테고리의 다른 글

문자열 컨트롤  (0) 2014.03.25
class연습  (0) 2013.10.27
Class 예문  (0) 2013.10.27
Class 사용법  (0) 2013.10.27
파일업로드 시 파일명 관리  (0) 2013.10.24
Posted by 초보용
,

Class 예문

PHP 2013. 10. 27. 13:17
 
- 기본 -
     class Member
     {
          var $mName;
          var $mAge;

          function printMember()
          {
               echo "이름 : $this->mName<br>";
               echo "나이 : $this->mAge";
          }
     }

     $obj = new Member;
     $obj -> mName = "정한영";
     $obj -> mAge = "28";

     $obj -> printMember();

- 생성자 -

     class Member
     {
          var $mName;
          var $mAge;

          function Member($_Name, $_Age)
          {
               $this->mName = $_Name;
               $this->mAge = $_Age;
          }

          function printMember()
          {
               echo "이름 : $this->mName<br>";
               echo "나이 : $this->mAge";
          }
     }

     $obj = new Member("정한영", 22);

     $obj -> printMember();

- Extends -

     class Member
     {
          var $mName;
          var $mAge;

          function Member($_Name, $_Age)
          {
                  $this->mName = $_Name;
                  $this->mAge = $_Age;
          }

          function printMember()
          {
               echo "이름 : $this->mName<br>";
               echo "나이 : $this->mAge";
          }
     }

     class addMember extends Member
     {
          var $mPhone;

          function printMember()
          {
               echo "이름 : $this->mName<br>";
               echo "나이 : $this->mAge<br>";
                  echo "전화 : $this->mPhone";
          }
     }

     $obj=new addMember("정한영", 22);
     $obj->mPhone = "010-5151-2929";
     $obj->printMember();


[펌] http://envenstar.blog.me/30145720713 

'PHP' 카테고리의 다른 글

class연습  (0) 2013.10.27
클래스 & 객체  (0) 2013.10.27
Class 사용법  (0) 2013.10.27
파일업로드 시 파일명 관리  (0) 2013.10.24
파일다운  (0) 2013.10.24
Posted by 초보용
,

Class 사용법

PHP 2013. 10. 27. 13:14

class MemberProcess
{
  var $SQL = "";
   var $ReturnArr = array("Result"=>"","Msg"=>"");

        function MemberProcess()    //클래스 생성자
        {
            $this->db   =   new CDB;
            $this->db->Connect();
        }


        function CheckId($Uid)     // ID존재여부를 체크한다.
        {
            $this->SQL    =   " select * from TB_manager where user_id = '$Uid' ";
            $this->db->Query($this->SQL);
            $this->total  =   $this->db->RecordCount();
            return $this->total;
        }

        function CheckPwd($Uid,$PassWd)   // 비밀번호가 맞는지 체크한다.
        {
                $this->SQL = " select * from TB_manager where user_id = '$Uid' and user_pwd = '$PassWd' ";
                $this->db->Query($this->SQL);
        //      echo $this->SQL ;
                $this->total = $this->db->RecordCount();
                return $this->total;
        }


        function LoginChk($Uid, $PassWd)  //유효한 사용자인지 로그인전 확인한다.
        {
                if($this->CheckId($Uid) <= 0)
                {
                        $this->ReturnArr[Result] = false;
                        $this->ReturnArr[Msg] = $Uid."는 존재하지 않는 아이디 입니다";
                }
                else
                {
                        if($this->CheckPwd($Uid, $PassWd) <= 0)
                         {
                                $this->ReturnArr[Result] = false;
                                $this->ReturnArr[Msg] = "비밀번호가 일치하지 않습니다.!";
                         }
                        else
                         {
                                $this->ReturnArr[Result] = true;
                                $this->ReturnArr[Msg] = "";
                         }
                }

                return $this->ReturnArr;

        }


        function LogOut($cookie_domain="")   //로그아웃을 처리한다.
        {
          setcookie("web_id","",0,"/",$cookie_domain);
          setcookie("web_name","",0,"/",$cookie_domain);
          setcookie("web_email","",0,"/",$cookie_domain);
          setcookie("web_level","",0,"/",$cookie_domain);
          setcookie("web_company","",0,"/",$cookie_domain);


          $this->ReturnArr[Result] = true;
          $this->ReturnArr[Msg] = "안녕히 가십시오..";

          return $this->ReturnArr;

        }

        function LogIn($Uid,$Pwd,$cookie_domain="")  //로그인을 처리한다.
        {

          $RtnArr = $this->LoginChk($Uid,$Pwd);

           if($RtnArr[Result])
            {
              $row = $this->db->fetcharray();

              SetCookie("web_id",$row[user_id], 0, "/", $cookie_domain);
              SetCookie("web_name",$row[user_name], 0, "/", $cookie_domain);
              SetCookie("web_email",$row[user_email], 0, "/", $cookie_domain);
              SetCookie("web_level",$row[user_level], 0, "/", $cookie_domain);
              SetCookie("web_company",$row[member_of], 0, "/", $cookie_domain);

            }

          return $RtnArr;


        }
}


/**********************************************************************
  사용 방법
***********************************************************************  
include_once "class/DB.php";  // DB연결 클래스 샘플은 아래 있당
include_once "class/MemberProcess.php"; //로그인 처리 클래스


$cMember = new MemberProcess;  //클래스 생성


//로그인 처리 LogIn(아이디,비밀번호,쿠키URL)
$Cuser = $cMember->LogIn("hawk5","hawk6","mydomain.com");


//로그인 결과 처리

if($Cuser[Result])
{
        echo("
            <script>
                location.href='/';
            </script>
        ");
}
else
{
        echo("<script>alert('$Cuser[Msg]');history.go(-1);</script>");
}

***************************************************************************/
  
?>


[펌] http://blog.naver.com/neohawk5?Redirect=Log&logNo=140131812745
'PHP' 카테고리의 다른 글

클래스 & 객체  (0) 2013.10.27
Class 예문  (0) 2013.10.27
파일업로드 시 파일명 관리  (0) 2013.10.24
파일다운  (0) 2013.10.24
PHP 환경변수  (0) 2013.10.24
Posted by 초보용
,

출처 : http://blog.daum.net/thecoolman/3797336


아래 내용을 그대로 가져가서 사용하면 된다.

기본적인 내용은 주석처리 되어 있으니, 사용하는데 별 어려움이 없을 것으로 생각된다.

////////////////////////////////////////////////////////////////////////////////////
<%
'파일업로드 기본 설정
Response.Expires = -10000
Server.ScriptTimeOut = 300
Set theForm = Server.CreateObject("ABCUpload4.XForm")
theForm.Overwrite = True
theForm.MaxUploadSize = 8000000  '8M 업로드 가능
Set FSO = Server.CreateObject("Scripting.FileSystemObject")
theForm.AbsolutePath = True
Dim fileName,fileSize


Function GetUniqueName(strFileName, DirectoryPath)
    Dim strName, strExt
    '확장자가 없는 경우를 처리
    if InstrRev(strFileName, ".") = 0 then
        Response.write ""
        Response.end
    End if
    strName = Mid(strFileName, 1, InstrRev(strFileName, ".") - 1)
    strExt = Mid(strFileName, InstrRev(strFileName, ".") + 1)

    'asp파일 업로드 불가
    if strExt = "asa" or strExt = "asp" or strExt = "aspx" or strExt = "inc" or strExt = "bak" or strExt = "php" or strExt = "html" or strExt = "htm" then
        Response.write ""
        Response.end
    End if

    Dim bExist : bExist = True
    Dim strFileWholePath : strFileWholePath = DirectoryPath & "\" & strName & "." & strExt
    Dim countFileName : countFileName = 0

    Do While bExist
        If (fso.FileExists(strFileWholePath)) Then
            countFileName = countFileName + 1
            strFileName = strName & "(" & countFileName & ")." & strExt
            strFileWholePath = DirectoryPath & "\" & strFileName
        Else
            bExist = False
        End If
    Loop
    GetUniqueName = strFileWholePath
End Function


Sub Exec_fileUp(newFile,deleteFile,deleteFilesize,DirectoryPath,num)
    Set theField = newFile(num+1)
    If theField.FileExists Then           '만일 파일업을 했으면...
        strFileName = theField.SafeFileName       '파일 명
        strFileSize = theField.Length          '파일 사이즈

        '파일명을 정한다.
        strExt = Mid(strFileName, InstrRev(strFileName, ".") + 1)
        strName = Date() & Hour(time) & Minute(time) & Second(time)
        strName = Replace(strName,"-","")
        strFileName = strName & "." & strExt

        if theField.Length > 8000000 then
            Response.Write ""
            Response.end
        Else
            if Len(deleteFile) > 0 then         '삭제 화일이 있을경우..              
                delfile = DirectoryPath & "\" & deleteFile                  
                If (fso.FileExists(delfile)) Then
                    fso.DeleteFile(delfile)         '파일을 지운다..
                End if
            End if
            strFileWholePath = GetUniqueName(strFileName, DirectoryPath)  '적합한 파일인지 체크한다.
            theField.Save strFileWholePath        '파일을 저장한다.
        End if
        fileName = strFileName
        fileSize  = strFileSize
    Else
        fileName = deleteFile
        fileSize  = deleteFilesize
    End If
End Sub


'파일 업로드, 업로드 폼이 추가 되면 아래 문장만 추가하면 된다. 물론 파일명은 수정해 줘야 한다.
CALL Exec_fileUp(theForm.item("fileUpload"),"","",DirectoryPath,0)

위 CALL 문장은 파일을 업로드 하는데 사용을 하면 되고,
수정을 할 경우에는.. 아래 문장을 사용하면 된다.
사용할 경우 삭제할 파일명과 사이즈를 먼저 구한 후에 실행을 해야 한다.

<%
'파일 업로드 및 삭제
CALL Exec_fileUp(theForm.item("fileUpload"),DelfileUpLoad,DelfileSize,DirectoryPath,0)
%> 

파일을 다운로드 받을 경우, Stream 을 이용해서 다운을 받는다.
<%
'파일 이름
FileName  = Request("FileName")
    Response.ContentType = "application/unknown"    'ContentType 를 선언합니다.
    Response.AddHeader "Content-Disposition","attachment; filename=" & FileName  '헤더값이 첨부파일을 선언
    Set objStream = Server.CreateObject("ADODB.Stream")
    objStream.Open
    objStream.Type = 1
    objStream.LoadFromFile Server.MapPath("\admin\ad\UpLoad") & "\" & FileName  '절대경로
    download = objStream.Read
    Response.BinaryWrite download   '이게 보통 Response.Redirect 로 파일로 연결시켜주는 부분을 대신하여 사용된 것입니다.
    Set objstream = nothing
%>

'ASP' 카테고리의 다른 글

asp 노캐쉬  (0) 2013.10.29
엑셀전환시 <br>태그  (0) 2013.10.28
폴더검색 fso  (0) 2013.10.24
asp 모든폼 갖고오기  (0) 2013.10.24
Dext sumnail 새창으로 메일 보기  (0) 2013.10.24
Posted by 초보용
,

<?php
//업로드 폴더
$path = './upload/';

//파일이 정상적으로 서버까지 올라온 상태라면
$img_file = $_FILES['img']['tmp_name'];
if ($img_file)
{
#################
### 변수 정의 ###
#################

//그냥 파일명
$img_file_name = $_FILES['img']['name'];

//파일명 추출을 위한 배열 생성
$file_type_check = explode('.',$img_file_name);
//print_r($file_type_check);

//파일 확장자 체크
$file_type = $file_type_check[count($file_type_check)-1];
//echo $file_type;

//확장자를 제외한 파일명 추출
$i = 0;
while($i < count($file_type_check)-1){
$real_filename .= $file_type_check[$i];
$i++;
}
//echo $real_filename;


#######################################################
####### 파일 명에 숫자 붙여서 업로드 하는 형태 ########
#######################################################

//파일 존재 여부 체크
$exist_flag = 0;
if(file_exists($path.$real_filename.'.'.$file_type)){ //파일이 존재한다면
$i = 0;
while($exist_flag != 1){ //존재하지 않을때 까지 루프
if(!file_exists($path.$real_filename.'['.$i.'].'.$file_type)){ // 경로/파일명[$i].확장자 존재한다면
 $exist_flag = 1; // 존재함을 표시하고
 $img_file_name = $real_filename.'['.$i.'].'.$file_type; // 확인된 파일명으로 업로드 파일명 설정
}
$i++;
}

}
//파일 업로드
if(!@copy($img_file, $path.$img_file_name)) { echo("error"); }


#######################################################
####### 파일명을 업로드 시간으로 변경하는 형태 ########
#######################################################

//시분초.확장자
$img_file_name = date("YmdHis").'.'.$file_type;
if(!@copy($img_file, $path.$img_file_name)) { echo("error"); }

###################################################
####### 파일명에 업로드 시간을 붙이는 형태 ########
###################################################

//파일명_시분초.확장자
$img_file_name = $real_filename."_".date("YmdHis").'.'.$file_type;
if(!@copy($img_file, $path.$img_file_name)) { echo("error"); }

}


// 이건 간단한 업로드 형태이고,

// 최근 포털등의 업로드 형태는 가만... 보면
// 서버에 업로드 되었을때는 파일명 자체를 암호화(?) 등의 패턴 형태로 업로드 시키고,
// 업로드한 파일명을 따로 관리한다

// 즉 db 에 파일명 필드가
// 유저가 업로드한 파일명 || 실제 서버에 업로드 되어 있는 파일명
// 으로 구분해서 관리한다는 뜻이다.

// 위에 제시한 방식은 블로그 방문자의 요청에 의해
// 유저가 업로드 한 파일명을 컨트롤 하는 형태이다.

// 유저가 업로드한 파일명 || 실제 서버에 업로드 되어 있는 파일명 으로 관리하겠다고 하면
// 업로드 되는 파일명 자체를 md5 해서 쓰거나 str_replace(urlencode(파일명),'%','') 이런식으로 쓰는것도 나쁘지 아니한것 같다.

'PHP' 카테고리의 다른 글

Class 예문  (0) 2013.10.27
Class 사용법  (0) 2013.10.27
파일다운  (0) 2013.10.24
PHP 환경변수  (0) 2013.10.24
쿠키  (0) 2013.10.24
Posted by 초보용
,